
Imagine you are planning an event, like a product launch or a conference, and you want to display the remaining time until the event starts on a large screen or monitor.
Yes, you can use Excel as a shortcut to create a countdown timer that automatically updates and displays the remaining time.
But Is there any stopwatch function in Excel?
Keep Reading, As in this post, I’m going to answer all your questions and provide a step-by-step tutorial for adding a timer.
So, Let’s get started.

How To Make The Countdown Timer
First things first. There aren’t any timer functions in Excel. You have to create the timer in a suitable format. Let’s say in h:mm:ss format where h represents hour, mm represents minutes in two-digits, ss denotes the seconds in two-digits numerical value.
Preliminary Step: You need to enable VBA in your worksheet to create a timer as I will be using VBA Codes.
Here are the steps to make a countdown timer in Excel:
1. Format the Active Cell
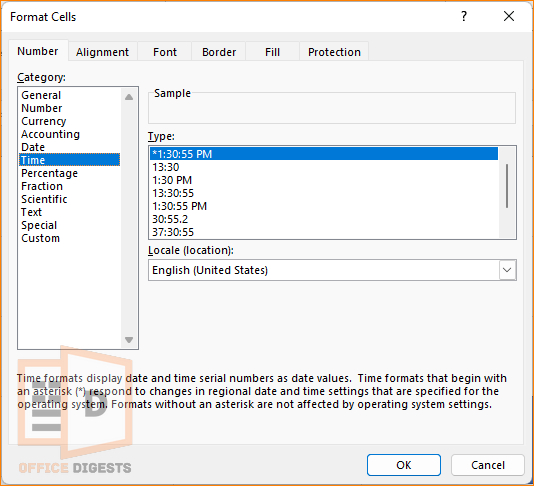
The first and foremost thing you must do is format the active cell. Let’s say I want to set a timer for 5 minutes. For such, I am typing 0:05:00 as my desired number format.
After that, Press Ctrl+1 to open the Format cells dialog box. Change the Language (Location) to English (United States). Click on the Time Category and select the type of format as 13:30:55. Press OK.
Now, let’s move on to the next step.
2. Insert and Run a Macro
To insert a module in your current workbook, you must enable the Developer Tab. Then Go to Visual Basic. Select the Insert Module option at the top left corner beside the Excel logo. Paste the following code-
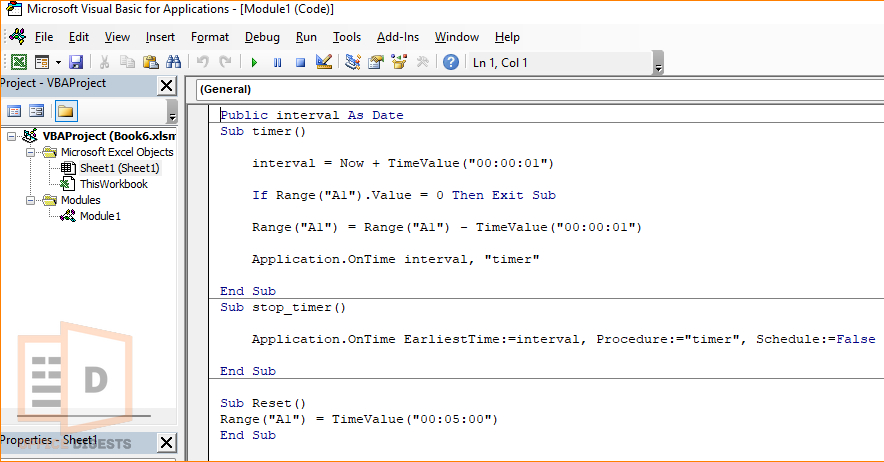
Sub timer()
     interval = Now + TimeValue("00:00:01")
     If Range("A1").Value = 0 Then Exit Sub
     Range("A1") = Range("A1") - TimeValue("00:00:01")
     Application.OnTime interval, "timer"
End Sub
Run the Sub/UserForm and View the Microsoft Excel Sheet. The timer started as soon as you pressed the Run Button.
Now, I know that this technique is easy at the beginning but gets challenging on day to day use. You don’t want to spend 20 seconds of your valuable time running a VBA code. If you wish there were a button on the active spreadsheet, then the entire process would have been splendid.
So, let’s dive in to make an active Start and Stop Buttons for the timer.
Add Interactive Buttons in the WorkSheet to Control the Timer
Macro-enabled buttons help accomplish complex tasks with just a single click. Not only that, these buttons help save time.
Imagine a button sending digital salary payslips to your employees with just a single click when you were grinding for hours typing the email addresses every month.
Similarly, for the timer, let’s create some interactive buttons to start, stop, and reset the time every time you open your worksheet.
Follow the steps below to add buttons to control the timer in Excel:
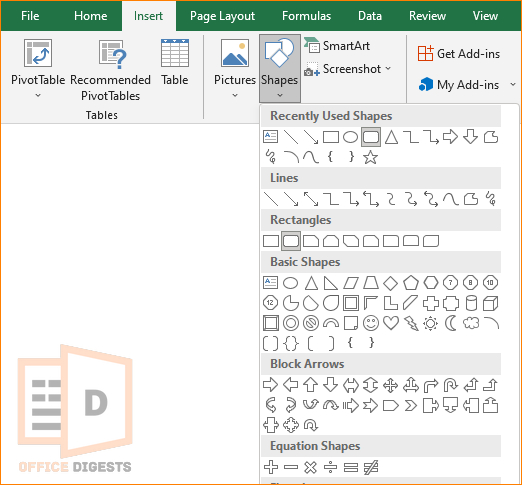
1. Insert Rectangular Shapes to Cells
Go to the Insert Tab and select Shapes right beside the Pictures Option. Choose any shape you like. I prefer choosing the Rounded Rectangle Shape as it looks good on the worksheet.
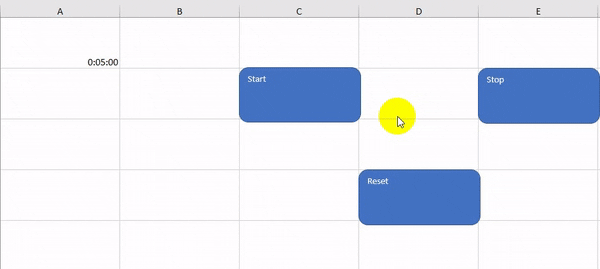
Now, select the region where you want to place the shape.
I recommend inserting three buttons. One is to start the timer, another is to stop the timer, and the other is to reset the time. Double-click on the shapes to Insert Texts. Type the name of the Buttons.
2. Assign Macro To Each Button
Assigning codes to each button means making the buttons interactive. Like, you want to start the timer by clicking on a certain button.
So, right-click on the Start Button and Select Assign Macro option.
Note: The main VBA Code you entered in the previous section still remains intact.
Set a Macro Name. Let’s say Timer and select the option Macros in This WorkBook. After that, click on Edit.
Now Insert only one line of code- Public interval As Date.
The Overall code for the Start Button will Look something like this:
Public interval As Date
Sub timer()
    interval = Now + TimeValue("00:00:01")
    If Range("A1").Value = 0 Then Exit Sub
    Range("A1") = Range("A1") - TimeValue("00:00:01")
    Application.OnTime interval, "timer"
End Sub
Now, click on the Save Button.
For the Stop Button, select the rectangular shape that say’s Stop Timer. Right-click on the shape and assign a Macro. Save a Name for the macro and click on the New Button and Enter the following code:
Sub stop timer()
    Application.OnTime EarliestTime:=interval, Procedure:="timer", Schedule:=False
End Sub
For resetting time, similarly right-click on the reset button and assign a macro. Enter a macro name and click on Add. Paste the following command:
Sub Reset()
Range("A1") = TimeValue("00:05:00")
End Sub
Note: There are some variables in this code. Change the Range(“A1”) cell to the place where you placed the countdown timer. And also, change the TimeValue as per your countdown interval.
3. Test The Timer
Now, it’s time for testing the timer you made. First of all, try clicking all the buttons and check if they are interacting or not.
Secondly, what other people don’t tell you is that you have to enable all macros and allow the trust access to the VBA project object model to save and reopen the worksheet in macro-enabled format.
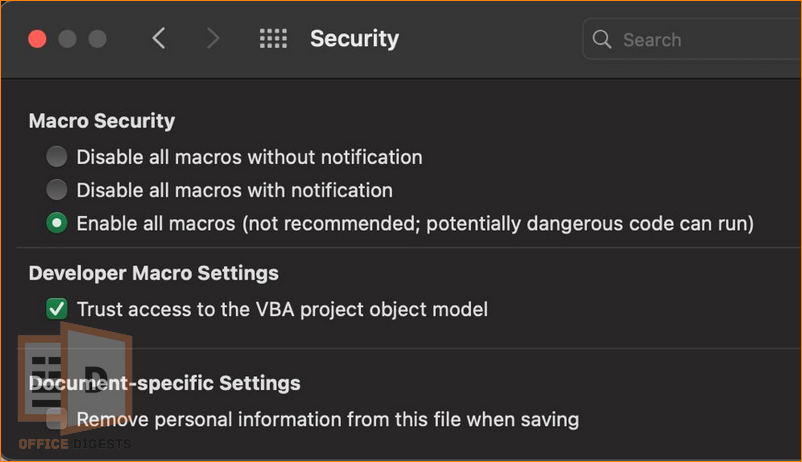
For Mac Users, Go to Excel > Preferences > Security > Enable all macros under Macro Security and allow trust access to Developer Macro Settings.
For Windows Users, Go to File > Options > Trust Center > Trust Center Settings > Macro Settings > Enable all macros.
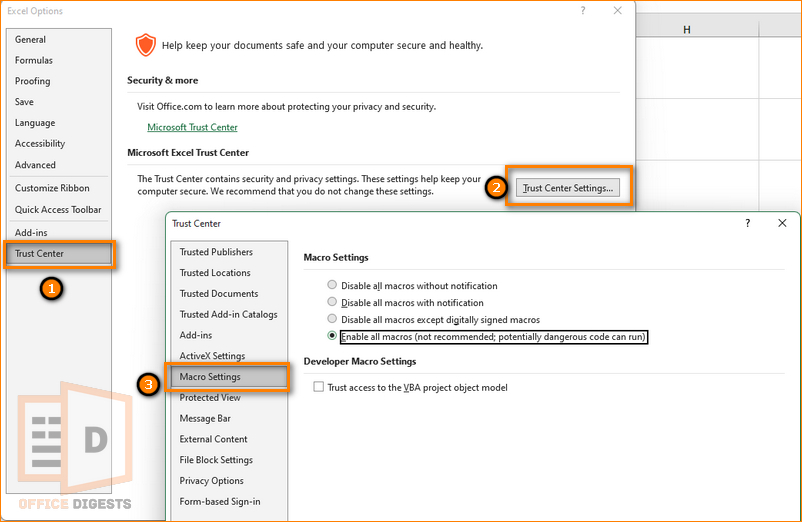
By default, this setting remains disabled due to security reasons, because there can be potentially dangerous codes running in the background that can hamper your system.
Can You Create A Countdown Timer in Excel Without VBA?
Unfortunately, you cannot create a single or multiple countdown timers in Excel without the help of VBA codes or macros. Excel doesn’t have any built-in feature to do so.
However, you can countdown days without using any macro. By using a simple built-in Excel function, you can now set a reminder to your important day.
Say no more to marking on calendars. Follow the next section to know the exact steps.
How to Countdown Days in Excel
Previously I have made a detailed post on counting dates in Excel. If you haven’t checked it yet, be sure to read that post first.
For Excel to countdown the number of days remaining, you have to use the TODAY function. Here’s how to allow Excel to countdown days remaining from today:
- Select any cell and type in the date of your important schedule.
- Refer to any cell in a blank cell. For Example, for this scenario I am using A2 as the reference cell.
- Type =reference_cell – TODAY() &” day(s) remaining” and press Enter to execute the formula.
Now suppose I have an important meeting on April 22, 2023. I will type the day in this format in cell A2 and in cell B2 I will type =A2-TODAY() &”day(s) remaining. By pressing Enter, Excel will return the result with 23 days remaining.
This is how you set up a countdown timer for free in Excel.
FAQ
Question: What is a Countdown Timer?
Answer: Countdown timers are like digital clocks that count down from a certain number or date. The counting starts backwards to indicate the remaining time or date.
Question: Can you insert a countdown timer into Excel?
Answer: Yes, you can insert countdown timers in Excel. First, format the cells to the required time format and then run a custom user defined function (UDF).
Final Words
In this way, you can add a Stop or Pause Feature to the Timer and apply your creativity to design a great dashboard using Excel. In fact, if you want, you can add multiple dynamic countdown timers in the same workbook. Just ensure that the assigned names of the Macros are unique.
Surprise your friends with this amazing skill and make your own countdown timer template in Excel.