This article will guide you through the process of calculating the amortization schedule with irregular payments in Excel.
It is a current loan amount when the borrower made payments that were different from those specified in the original loan conditions.
If you purchased or sold anything via an Agreement for Deed, but the borrower has so far not paid the monthly payments stated in the loan arrangement, using the amortization schedule calculation in Excel with irregular payments may be of assistance.
Getting out of debt is the first step toward financial independence. Will making additional and irregular payments help you pay back your loan or mortgage more quickly? Yes, it does.
There are many ways that this Excel tutorial (Amortization schedule with irregular payments) may help you handle your mortgage payment problems, including:
- Creating a loan amortization schedule in Excel
- Amortization Schedule for a variable number of periods
- Loan amortization schedule with additional payments
So, continue reading this post until the end to learn in detail.
How To Create An Amortization Schedule In Excel
We can create an amortization schedule in Excel in many different ways. But in this article, we will show you the three effective and easy ways to do that. And for that, we will need to use the below functions:
- PMT function: The PMT function is used to determine the entire amount of a monthly payment in a single step. It is guaranteed that this sum will remain consistent during the loan’s term.
- PPMT function: The PPMT function calculates the principal portion of every payment that is applied to the loan principal, which is the amount you owe on loan. If you make further payments, the amount will grow.
- IPMT function: IPMT is a function that finds the interest portion of every payment that is applied to interest charges. For each payment, the sum of this loan lowers.
So, let’s walk through the procedure step-by-step right now.
1. Create The Amortization Table
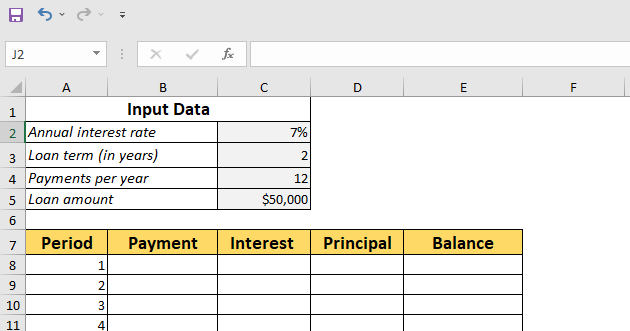
To begin with, first, we will have to create the amortization table. For that, choose the input fields into which you will put the relevant aspects of a loan. In our case, we chose the following cells with data. Those are:
- C2: For Annual interest rate
- C3: For loan terms in years
- C4: For the number of payments per year
- C5: For loan amount
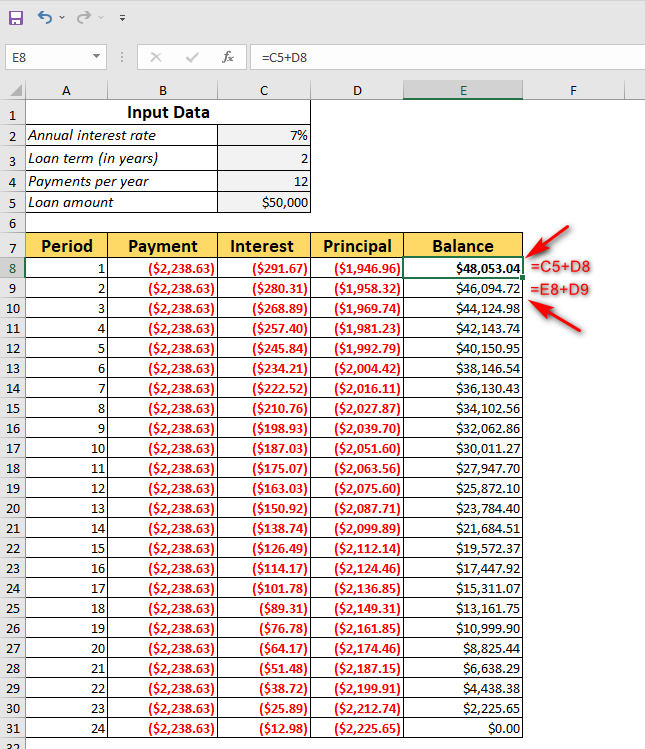
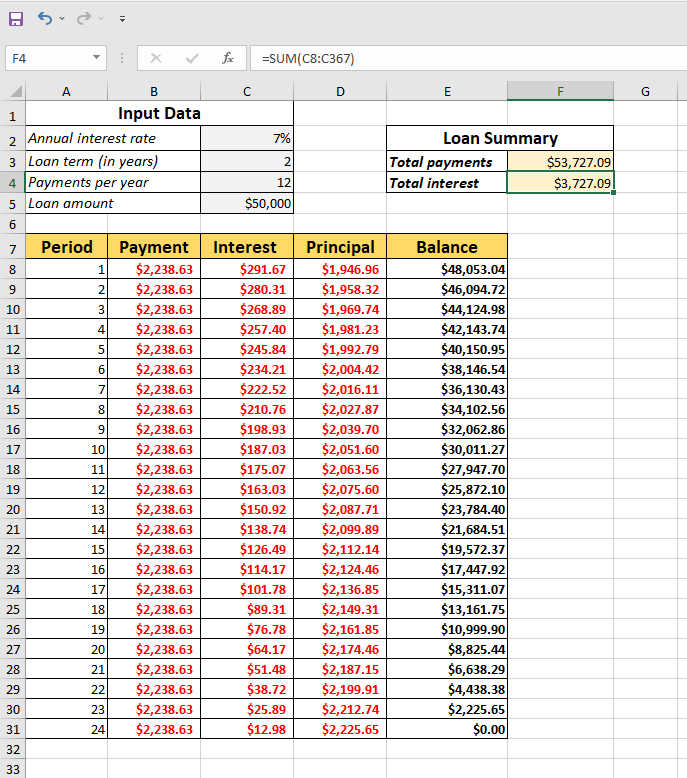
The next step is to build an amortization table in A7:E7 under the Input Data section with the headings Period, Payment, Interest, Principal, and Balance, as shown in the following image. Now, Inside the Period column, write a sequence of integers corresponding to the full number of payments. In this instance, we will put from 1 to 24.
Having established the foundational elements, let’s move on to the most exciting part of the process: loan amortization formulae.
2. Estimate the total payment amount (PMT formula)
Now that we created our table, it’s time for the main part. Now, we will calculate and estimate the total payment amount by using the PMT formula. Wanna know the syntax of this formula? Here it is:
PMT(rate, nper, pv, [fv], [type])
Here, we can see:
Rate: Divides the annual rate of interest by the number of payment cycles in a year ($C$2/$C$4).
Nper: Nper is the outcome of multiplying the number of years by the number of payment cycles per year ($C$3*$C$4)
PV: To fill out the PV argument, provide the amount of the loan ($C$5).
FV and Type: It is OK to ignore the FV and type parameters because their default values are sufficient for our purposes. As previously stated, the balance following the final payment is expected to be zero; payments are paid at the end of each month.
However, for the Rate and NPER arguments to function successfully with varied payment frequencies (for example, weekly, monthly, quarterly, and so on), you must maintain consistency with the values specified for the rate and NPER parameters.
So, when we put all of the reasoning above together, we obtain the following formula:
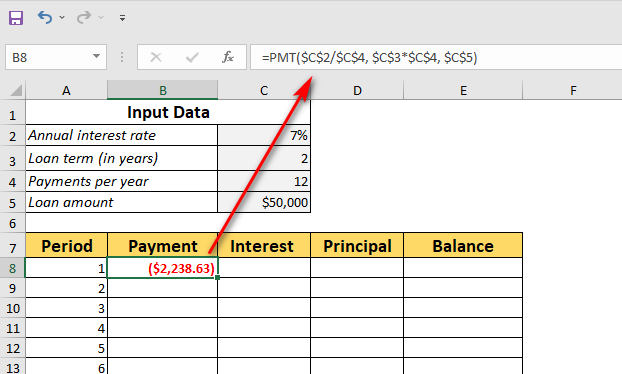
=PMT($C$2/$C$4, $C$3*$C$4, $C$5)
Please keep in mind that we are using absolute cell references since we want this equation to replicate to the cells below without any alterations to the original.
When you put the PMT formula in cell B8, you can drag it down the column, and you will see that the initial payment stays the same for all the years:
3. Calculate The Interest (IPMT formula)
The IPMT(rate, per, nper, pv, [fv], [type]) function can be used to calculate the total interest of each monthly payment. And the formula for our example would be:
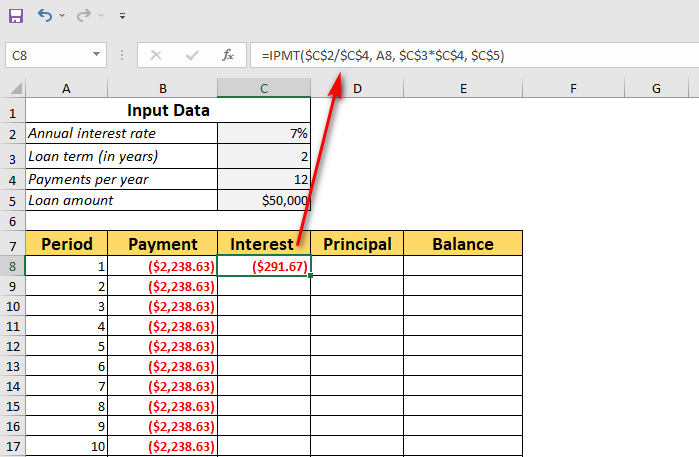
=IPMT($C$2/$C$4, A8, $C$3*$C$4, $C$5)
Here, all of the parameters are about the same as they are all in the PMT method. But there is an exception of the per argument, which determines the time period for payments. When this argument is given as an absolute cell reference (A8), it is expected to alter depending on where the formula is pasted in the row to which the argument is referring.
And now, we will copy this formula from cell C8 and then paste it to the remaining column cell by using the Fill Handle option, which is located in the bottom right corner of the cell.
4. Locate the principal (PPMT formula)
Now, we will find the principles in our demo spreadsheet. The following PPMT formula can be used to compute the principal portion of each monthly payment:
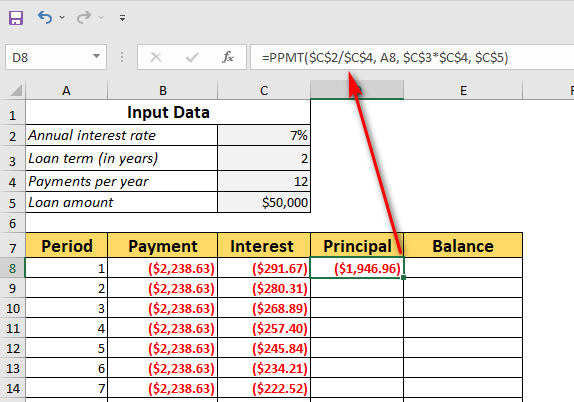
=PPMT($C$2/$C$4, A8, $C$3*$C$4, $C$5)
The syntax and parameters in this formula are identical to those in the IPMT formula explained previously.
This formula is applied to column D, starting with the cell number D8. And as usual, drag it down to the remaining cells by using the fill handle option.
Note:: Consider adding the values in the Principal and Interest columns together to see whether your calculations are right at this stage. The total should be the same as the number in the Payment column in the very same row unless the formula is wrongly stated.
5. Get the remaining balance
Now, the main task of our Excel amortization schedule with irregular payments article is to get the remaining balance of the loan sheet. In this part, we’ll be utilizing two separate formulas to figure out how much money is left over at the end of each month.
To calculate the sum in E8 after the first payment, put together the loan amount (C5) and the principle of the very first month (D8) as follows:
=C5+D8
Since the loan amount is a positive value while the principal is a negative value, both of these are actually deducted from the latter when computing the loan amount.
Again, for the next and all subsequent periods, put together the prior amount and the principal for the current period by following the below formula:
=E8+D9
So, the final formula is:
=IF(A9<=$C$3*$C$4, E8+D9, “”)
The preceding formula is applied to row E9, and then it is copied along with the column below. Using absolute cell references allows the formula to adapt accurately for every row, which is advantageous.
That’s all there is to it! The following is your monthly loan amortization schedule:
Pro Tip: Return payments as positive numbers
Since debt is paid from your bank account, the payments, interests, and principal are all returned as negative integers when using Excel functions. In the default setting, those numbers are marked in red and surrounded by brackets, just as you can see in the picture in the previous section above.
Hence, when using the PMT, IPMT, and PPMT functions, you may use a negative sign to ensure that all of the returns are positive values.
Instead of using additions for the Balance formulae, subtraction should be used. In that way, you can return payments as positive numbers.
However, you will get all those formulas readymade in the Excel file that we included in this post. So, you won’t have to worry about the formulas.
Amortization Schedule For A Variable Number Of Periods
In the preceding example, we created a loan amortization plan for a certain period of payments cycles, which we called the loan term. The above fast and simple one-time option is ideal for a single loan or mortgage transaction.
If you want to design an amortization schedule that can be reused and has a varied number of periods, you’ll need to take a much more extensive approach.
But don’t worry. Just like the previous method, we discussed and showed easy step-by-step ways to do that below:
1. Enter The Maximum Number of Periods
First thing first, you will have to write some numbers inside the Period column. Input the highest number of payments you are ready to accept for any mortgage, for example, from 1 to 360 payments for a $50000 loan. You may use Excel’s AutoFill tool to input a string of numbers more quickly than you would otherwise.
2. Use IF Formula in Amortization Schedule
Given that you seem to have a large number of extra period values, you must find a way to restrict the mathematical calculations to just include the real number of payments for a single loan. This may be accomplished by putting every formula inside an IF formula.
The IF formula performs a logical test to see if the periodic value inside the current row is below or similar to the total amount of payment periods or not. If the logical analysis returns TRUE, the associated function is performed; if the logical test returns FALSE, a blank string is sent.
So, considering that your Period 1 is in row 8, write the following formulae in the respective cells and then copy them across the whole table to complete the calculation.
Payment (B8):
=IF(A8<=$C$3*$C$4, PMT($C$2/$C$4, $C$3*$C$4, $C$5), “”)
Interest (C8):
=IF(A8<=$C$3*$C$4, IPMT($C$2/$C$4, A8, $C$3*$C$4, $C$5), “”)
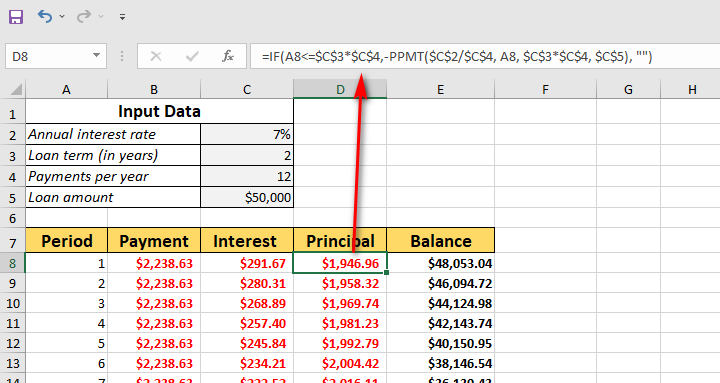
Principal (D8):
=IF(A8<=$C$3*$C$4,PPMT($C$2/$C$4, A8, $C$3*$C$4, $C$5), “”)
Balance:
The formula for Period 1 (E8) is the same as it was in the preceding example, which is as follows:
=C5+D8
However, In the case of Period 2 (E9) and all following periods, the equation will be as follows:
=IF(A9<=$C$3*$C$4, E8+D9, “”)
So consequently, once you are done following all the steps above, you will get a properly estimated amortization schedule, along with a lot of empty rows, also with period numbers when the loan has been completely repaid.
3. Hide Extra Periods Numbers
Seeing so many extra periods, numbers are always irritating and an eyesore. Unless you are willing to deal with a slew of unnecessary period numbers after your last payment, you may consider this process completed and go on to the next stage.
Use a conditional formatting rule that turns the text color to white for all rows after the final payment is made if you seek perfection like me. If you want to remove every unnecessary period, make conditional formatting rules that hide all rows when the last payment is made.
This can be done by selecting all of the data rows in your amortization table (in our example, those are A8:E367) and following the below steps.
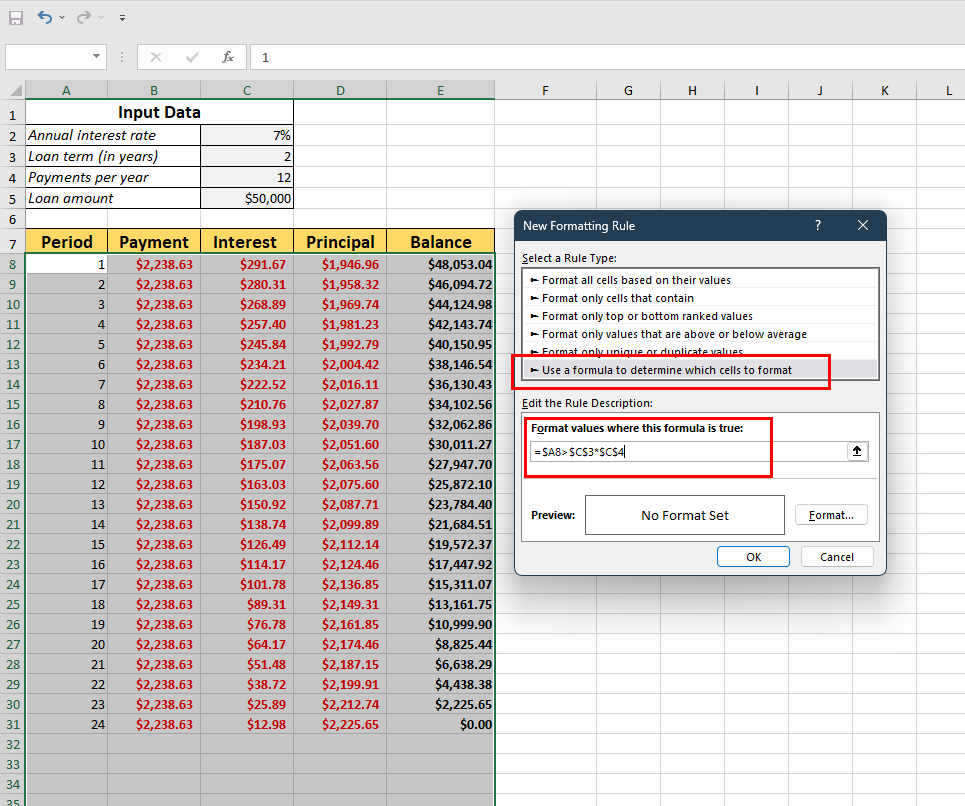
- Go to Home tab > Conditional formatting > New Rule… > Use a formula to determine which cells to format.
- Now, enter the following formula in the relevant field, which will determine if the period number in column A is more than the whole number of payments: =$A8>$C$3*$C$4
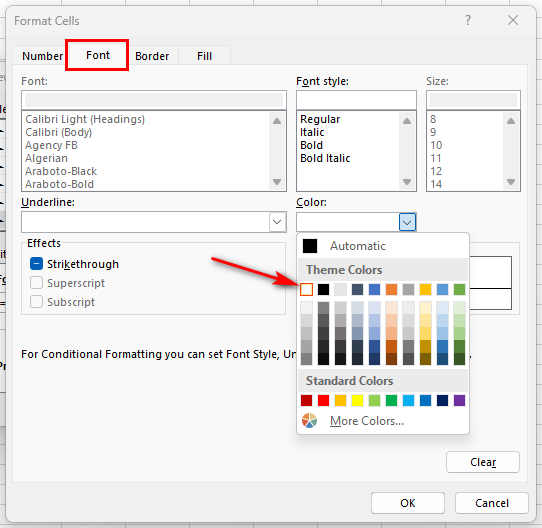
- Hit on the Format button, then go to the Font tab and select the white color.
Now you are done. The unnecessary period numbers will become white color.
4. Create A Loan Summary
Having a summery is always more than welcome. A handful of additional calculations at the top of your amortization plan will allow you to get the summary information concerning your loan at a glimpse.
So, to do that, take a look at the screenshot below and enter the formula given below:
In the Total Payments field (cell F2), enter the below formula:
=-SUM(B8:B367)
In the Total Interest (cell F3), enter the below formula:
=-SUM(C8:C367)
Note: If your payments are in the form of positive values, you may get rid of the negative sign from the preceding formulas.
And that’s all there is to it! Our loan amortization schedule has been prepared and is ready to be implemented!
Make An Amortization Schedule With Extra Payments In Excel
Simple to develop and follow, the amortization schedules outlined in the preceding scenarios are relatively easy to implement. They do not, however, provide a beneficial characteristic that several loan debtors are interested in – the ability to make extra payments to repay a loan more quickly.
For the sake of this scenario, we shall learn how to build a loan amortization schedule that includes irregular extra payments. So, to do that, follow the below steps carefully:
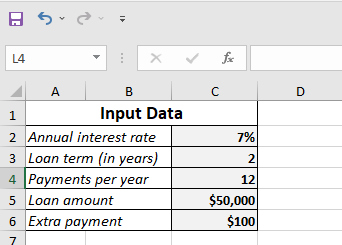
1. Specify the Input Cells
Set up the input cells first, as you would expect. In this scenario, let’s call those cells as follows in order to make our formulae simpler to comprehend:
- Annual Interest Rate = Cell C2
- Loan Term (in years) = Cell C3
- Payments Per Year = Cell C4
- Loan Amount = Cell C5
- Extra Payment = Cell C6
2. Calculate a scheduled payment
The planned payment amount (— in other words, the amount that will be paid on a mortgage if no additional payments have been made) is another specified field that is necessary for our subsequent calculations in addition to the input cells.
And according to the following formula, this quantity will be calculated:
=IFERROR(-PMT(InterestRate/PaymentsPerYear, LoanTerm*PaymentsPerYear, LoanAmount), “”)
Please keep in mind that we used a negative sign just before the PMT function in order to obtain a positive integer as an output of the function. We wrap the PMT function inside the IFERROR function in order to avoid problems in the event that any of the input cells are blank.
Inside a cell (in our example, cell G2), type the following formula and label the cell as Scheduled Payment.
3. Create The Amortization Table
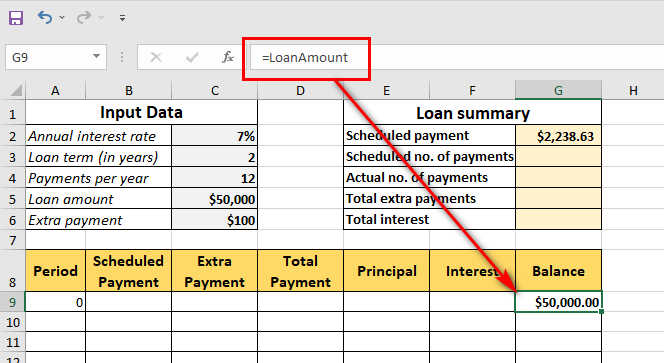
Using the headings provided in the image, build a loan amortization table and specify a period of time in the Period column, starting from 0. If you want, you may hide the Period 0 row later.
Input the highest number of payment times if you want to build a recyclable amortization schedule. In our demo, we chose 0 to 360.
To get the initial loan amount for Period 0 (row 9 in this example), use the Balance value. There will be no data in any of the other cells inside this row:
In G9, the formula is as follows:
=LoanAmount
4. Build formulas for amortization schedule with extra payments
Fill in the blanks in row 10 (Period 1) with the following formulae, and then repeat the process for each of the other periods by using the fill handle function.
Scheduled Payment (B10):
=IFERROR(IF(ScheduledPayment<=G9, ScheduledPayment, G9+G9*InterestRate/PaymentsPerYear), “”)
Extra Payment (C10):
Here, we will use the IF function, which is:
=IFERROR(IF(ExtraPayment<G9-E10, ExtraPayment, G9-E10), “”)
Total Payment (D10):
Here we will just add B10 and C10 for the current period:
=IFERROR(B10+C10, “”)
Principal (E10):
=IFERROR(IF(B10>0, MIN(B10-F10, G9), 0), “”)
Interest (F10):
=IFERROR(IF(B10>0, InterestRate/PaymentsPerYear*G9, 0), “”)
Balance (G10):
=IFERROR(IF(G9 >0, G9-E10-C10, 0), “”)
After you have done all the steps above carefully, and everything went according to plan, the amortization schedule will appear like this:
5. Hide extra periods
Just like the previous way, we will hide the extra periods.
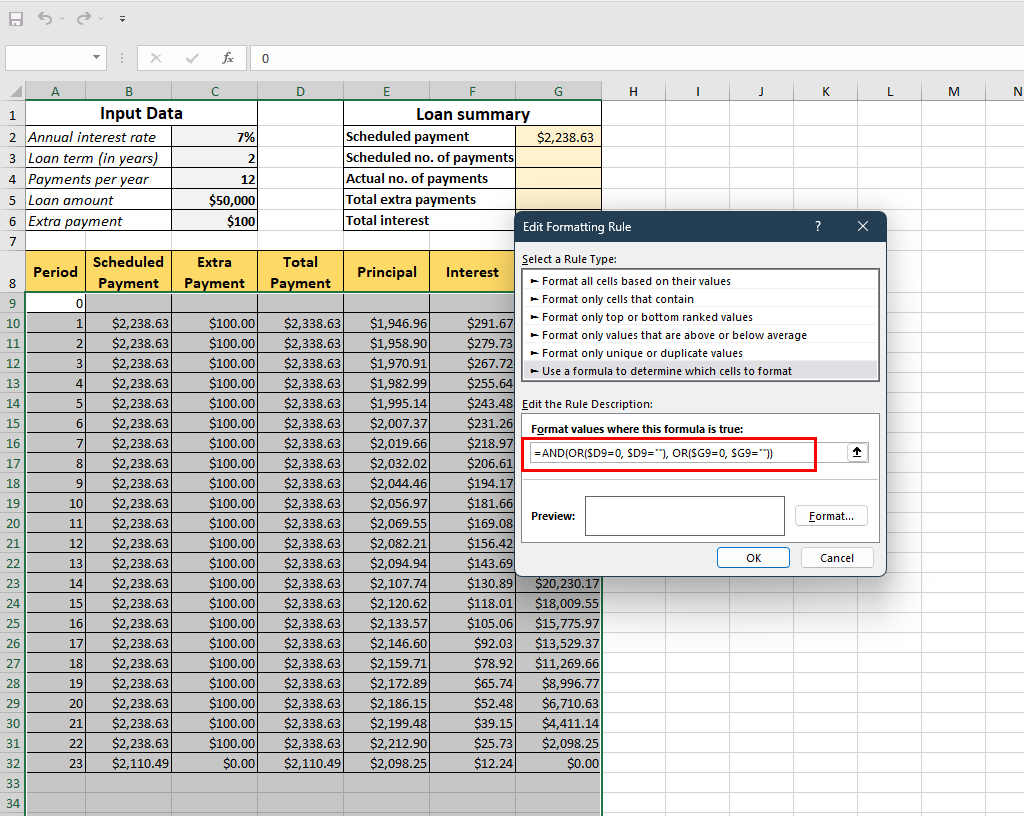
But there is a difference between the previous one and this one. The thing that has changed is that we use the white text color to indicate rows when the Total Payment (column D) and the Balance (column G) are equivalent to 0 or empty:
Enter the below formula like the previous way:
=AND(OR($D9=0, $D9=””), OR($G9=0, $G9=””))
And now, the following rows are concealed from view because they have a value of 0.
6. Make a loan summary
You may use the following formulae to output the most significant information about a mortgage as a last touch of mastery:
Scheduled number of payments:
=LoanTerm*PaymentsPerYear
Actual number of payments:
=COUNTIF(D10:D369,”>”&0)
Total extra payments:
=SUM(C10:C369)
Total interest:
=SUM(F10:F369)
Now, it’s done. Take a look at the screenshot below to see the final result:
amortization-table-with-irregular-payments-final-result
Conclusion
You can make your loan payments very easy and track your progress in Excel. We hope this article has helped you to understand the amortization schedule with irregular payments in Excel.


