
Checkboxes are a fantastic way to keep track of things. You might be using them for to-do lists or attendance or even a checklist for clients. No matter what you use it for, knowing how to insert a checkbox in Excel can come in handy.
However, unlike Google Sheets, finding the checkbox option in Microsoft Excel can be challenging. You can say it’s a little hidden in the functions. But once you know how to do it, it’s pretty easy. Let’s check out how you can do it too!
How Do You Insert a Checkbox in Excel?
To insert a checkbox in Microsoft Excel, you need to go to the Developer tab on the top of the page and select the Insert button drop-down. From the list of options, select the Checkbox and place it on to a cell.
Let’s break it down into steps so you can follow through.
Step 1: Click on the Developer Tab
Once you have launched Microsoft Excel, you will usually see a menu bar on the top of the screen. This menu is called the top ribbon. You must select the Developer tab from this ribbon to add a checkbox to your file.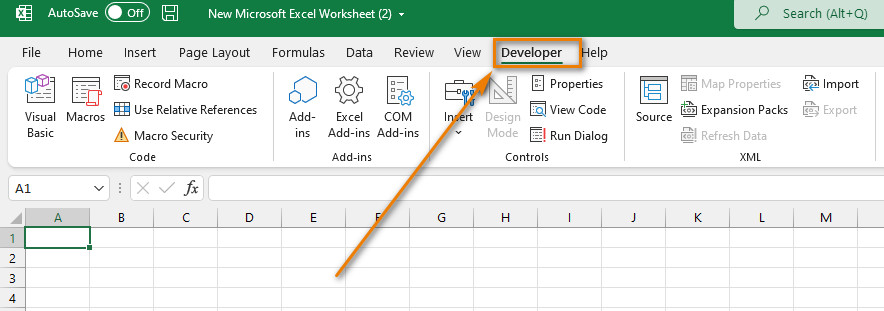
If you don’t have the Developer’s Tab. Go to File > Options > Customize Ribbon > Select the Developer Mode.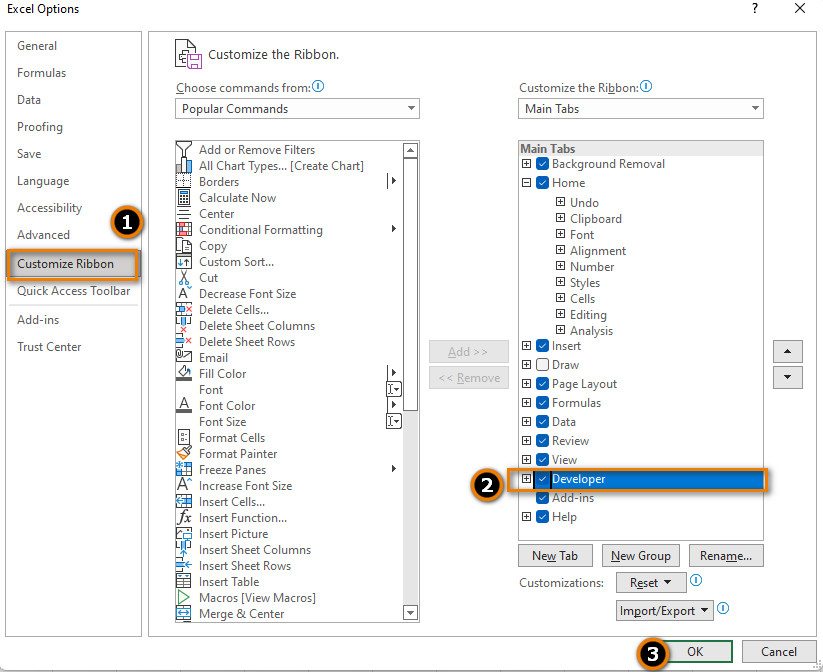
Step 2: Click on Insert
In the Developer tab, find the Controls section. You should see an Insert button with a drop-down arrow. Click on it to find the Checkbox option, which should look like a small box with a little tick symbol. Click on the checkbox icon.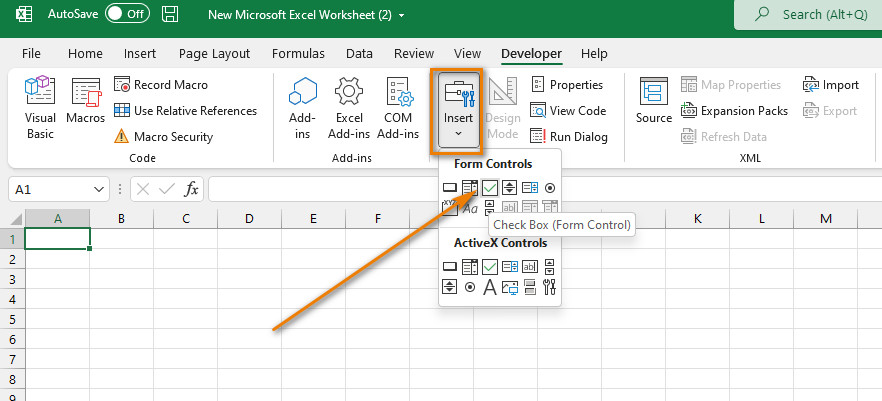
Step 3: Drag and Draw
Once you have selected the Checkbox, you will notice that your cursor turns into a crosshairs symbol or a small plus sign. Place the cursor where you want your Checkbox to be and left-click to drag and draw the box. Once you let go, that’s where your Checkbox will be.
You can click on the text to change it to something other than the default text, which should be something like “Checkbox 1”. You can also change the location or size of the box by clicking and dragging on the box. Once you have placed the box, you can left-click on it to make any further changes.
If you want to copy the Checkbox to multiple cells, click on the cell containing the Checkbox and drag the bottom right small cross that appears on the cell. Drag it through how many cells you want to cover vertically. This action will copy the checkboxes to all the cells in that column.
How Do You Add the Developer Tab in Excel?
If you want the Developer tab to show up on your top ribbon, you have to click on the File tab and then click on Options on the bottom left side of the screen. This click will open a pop-up window where you have to click on the Customize Ribbon setting. From there, look for the Developer option and click on it to make the checkbox blue.
It should be on the right side of the pop-up window on a list of tabs that already appear. Microsoft Excel does not show the Developer tab by default in your Excel file’s top ribbon because it features many advanced features you might not regularly need.
WIthout the Developer tab, you cannot add checkboxes to your files. But having the Developer tab always available makes it easy for you to add them to your Excel sheets.
How to Format a Checkbox in Excel
You can also make changes to the Checkbox in your Excel file or edit it by right-clicking it. If you left-click on it, you’ll see that you can check the box and mark it as done. To uncheck it, left-click on it again.
If you want to format it further, left-click on it again, and you’ll see a pop-up menu. Click on the Format Control option, and a window pops up.
You can change the background color inside the box in the Colors and Lines tabs. You can add a colored border to the box as well. To change the size, you can click on the Size tab and change the text in the Alt Text tab.
In the Control tab, you can change how the box is marked. A mixed option can especially come in handy when you are using VBA, and you want the box to remain neither Checked nor Unchecked until a specific action is taken.
You can also link the Checkbox to a particular cell by entering the cell number. Alternately, you can click on the cell box and select which cell you want to link on the sheet. There’s also a 3-D shading option for aesthetics.
How to Insert a Checkbox in Google Sheets
Inserting a checkbox in Google Sheets, on the other hand, is much easier. Select the cells you want to insert a checkbox into and click on the Insert button from the top menu. You’ll see a drop-down menu where you can click on the Checkbox option. That’s it!
Click on the Checkbox to mark it as checked, and click on it again to mark it as unchecked. To delete the Checkbox, click on the cell that contains it and press the Delete button on your keyboard.
You can also add custom cell values to your checkboxes if you want to use these checkboxes for other conditions. In that case, start by selecting the cells you want to insert checkboxes. Then from the top menu left, click on Data. Then go to Data Validation.
A pop-up window will show up. Click on the Criteria drop-down menu to select Checkbox. Then you can add custom values for your checkboxes.
Conclusion
Checkboxes can come in handy, especially when dealing with to-do lists or reports. Therefore knowing how to insert a checkbox in Excel is very useful. Even though it is pretty easy to do once you know about it, many people don’t know how to do it. Now you can use checkboxes to make all kinds of lists! Thanks for sticking around to the end.