You might have seen project managers adjust the deadlines by a certain number of days to accommodate unexpected delays.
So, do they just rewrite the dates? The answer is NO! They don’t redraft, rather they use Excel to automate their task for them.
To keep track of the project progress, they use a spreadsheet where each task is assigned a start date and a duration (in days) required to complete it.
In this post, we will show you how to add days to date in Excel the appropriate way. There will be 4 suitable methods. So, you can choose any of them.
Understanding Excel Date Formats
The moment you open up the Formatting cells dialog box using Ctrl+1 or Cmd+1 (for Mac), you will notice that there are 16 types of date formats available under the United States Location. The number of date formats varies when you change the location. However, the most common formats are dd/mm/yy or Month dd, yyyy. For Example: 31/07/23 or, July 31, 2023.
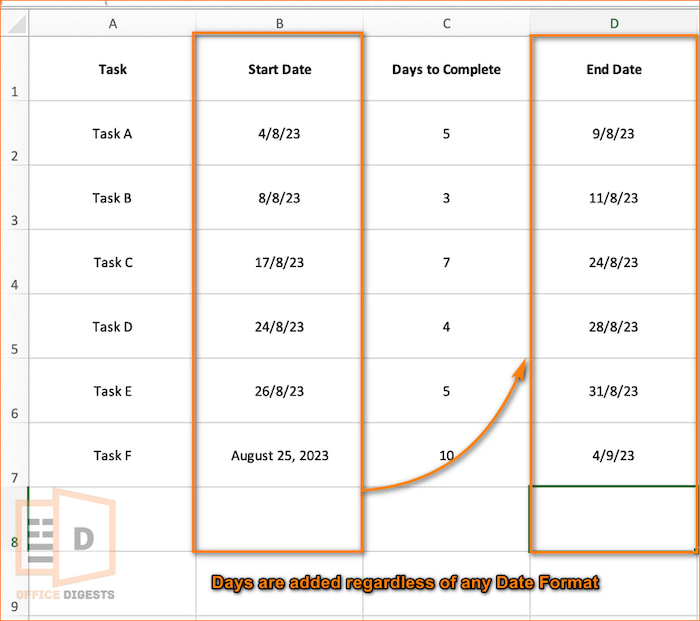
No matter what kind of formatting you are using (short date, long date, custom formats), the general rule of adding or subtracting days to a date remains the same.
Example
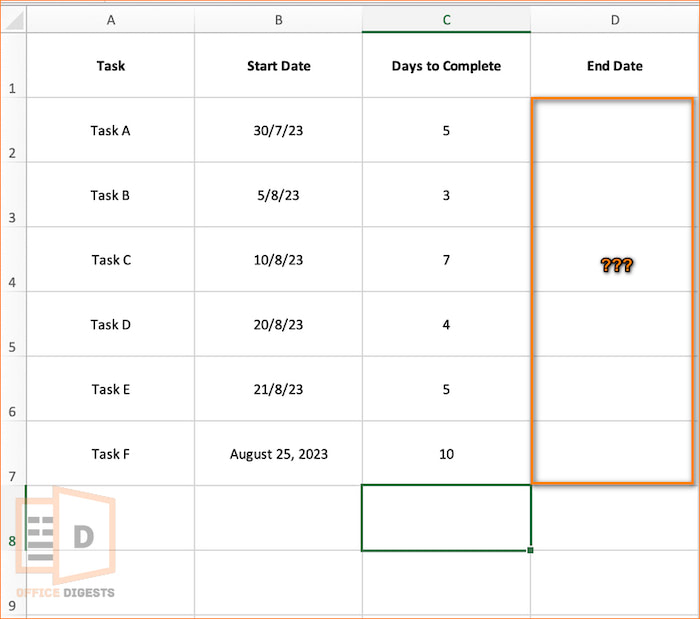
We prepared a dataset for you to understand the scenario clearly. We have scheduled 6 tasks, their starting date, and the time to complete those tasks. With this example, we will be finding the End date of the task by adding or subtracting days.
Also, Let’s see what happens when there are a mixture of date formats (see Task F).
Now, first, let’s look at how we can add days.
How To Add Days To Date in Excel
In our dataset, we have a mixture of date formats. We want to add the number of days to complete the task with the starting date. We have two options. You can either use an in-built formula or you can enter a manual formula without using any function.
So, here are the ways to add days to date in Excel:
1. Use Arithmetic Operators To Add Days
By arithmetic operation, we meant using the plus sign (+). Our data comprises a starting date in column B and an ending date in column D (to be found). The maximum number of days required to complete the task is in column C.
Select D2 as the active cell. Type =B2+C2 and press Enter. Now use the Fill Handle to drag the formula across all the cells.
value-error-excel
Notice that all the formulas showed accurate results except the last one. Because the last date format was in a General Formatting instead of a Date Format. As a result, we were shown the #VALUE! Error.
Even if we try to change the formatting from General to a long Date format, the error won’t go away.
NOTE: Using plus or minus sign to add or subtract days to a date won’t work if you have a mixture of date formats. The formatting should be similar for Excel to execute the task.
How To Mitigate the #VALUE! Error?
No matter what the formatting is, Excel will show a result in a default dd/mm/yy format or the VALUE! Error. The only way to mitigate the value! Error is to ensure that all the dates are in the same format. Let’s say mm/dd/yyyy or dd/mm/yyyy.
Here’s a quick trick. First, pre-format the cells as date from the Home Tab. You can use the Long, Short, or custom formats and then drag the Fill Handle. So now, let’s assume you selected a long date format. If you enter any short date, Excel will display the result as a long-dated format. For Example: the result will be Friday, 25 August, 2023 upon entering 25/8/23.
Or, the best method is to use a VBA Code (See method number 3).
2. Utilize The Paste Special Feature
The Paste Special feature is beyond the standard copy and paste operation. It allows you to choose how the data is pasted.
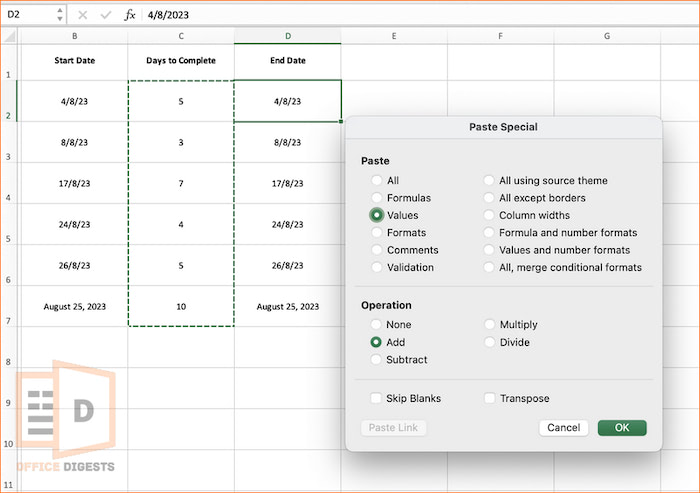
Copy the Starting Date and paste it in the Ending Date. Then Copy the number of days (column C in our case). Select the D2 cell and right-click. Select the Paste Special option and this will open up a dialog box. Select the values option along with the add option. Click OK to apply changes.
This method also doesn’t work with a mixture of date formats (Only the VBA Code does).
3. Apply a VBA Code
No matter what the formatting is, this code does it all. Say no worries to multiple date formats. With proof, we will show you that you can add days to any date format using this VBA Code.
VBA Code:
Sub AddDaysToEndDate()
    Dim ws As Worksheet
    Dim lastRow As Long
    Dim i As Long
    Set ws = ThisWorkbook.Worksheets("Sheet1") ' Replace "Sheet1" with your actual sheet name
    lastRow = ws.Cells(ws.Rows.Count, "B").End(xlUp).Row ' Assuming Start Date is in column B
    For i = 2 To lastRow ' Assuming data starts from row 2, change if needed
        Dim startDate As Date
        Dim deadlineNum As Long
        Dim endDate As Date
        On Error Resume Next
        startDate = DateValue(ws.Cells(i, "B").Value)
        deadlineNum = CLng(ws.Cells(i, "C").Value)
        On Error GoTo 0
        If IsDate(startDate) And deadlineNum <> 0 Then
            endDate = startDate + deadlineNum
            ws.Cells(i, "D").Value = endDate ' Assuming End Date will be placed in column D
        End If
    Next i
End Sub
Places that require modifications:
Some fields require slight changes depending on your workbook. Let’s break it down for you.
- Replace the Sheet1 name with the actual worksheet of yours. By Default, Excel shows Sheet1 if you didn’t change the worksheet name afterwards.
- Depending on the columns where your starting date, ending date, and number of days are present, some fields require modifications.
- lastRow = ws.Cells(ws.Rows.Count, “B”).End(xlUp).Row ‘Assuming Start Date is in column B.
- startDate = DateValue(ws.Cells(i, “B”).Value)
- deadlineNum = CLng(ws.Cells(i, “C”).Value)
- Cells(i, “D”).Value = endDate ‘ Assuming End Date will be placed in column D
- Since our dataset contained headers, we used the For Loop considering that our data started from row 2.
- For i = 2 To lastRow ‘ Assuming data starts from row 2, change if needed
Note: The Green text you see in the Visual Basic Editor shows all the necessary instructions for the places that might require modifications.
Result: Excel will display the date format as dd/m/yy regardless of any date format you enter.
Process on how to apply the VBA Code:
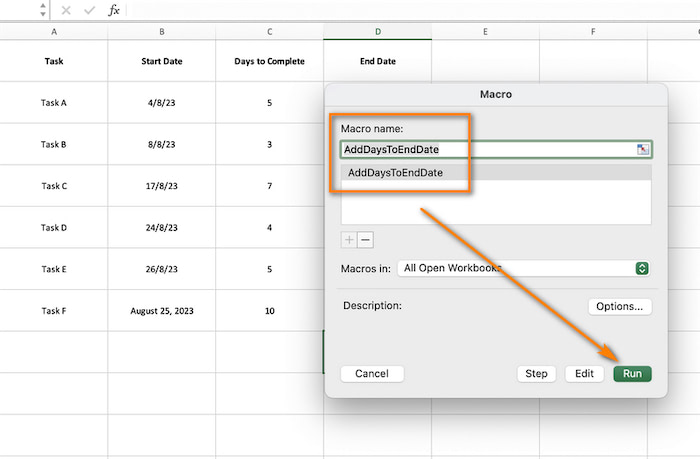
Go to the Developer Tab and select the Visual Basic Option. Insert a new module and paste the code. Modify the code accordingly (changing sheet name, column, and row numbers). Return to the Excel worksheet. Click on Macros under the Developer Tab. Run the AddDaysToEndDate Macro.
How To Subtract Months From a Date
Here we will be using the EDATE Function. EDATE Function stands for END DATE. It is used to calculate a new date by adding or subtracting a specified number of months from a given start date.
The syntax for EDATE Function is:
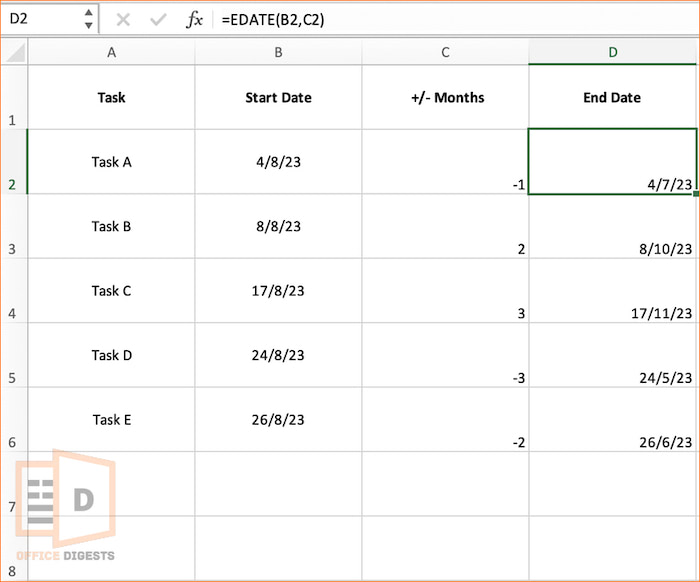
In our dataset, we have the starting date, increment and decrement of months, and the new end date (that needs to be found).
Press =EDATE in column D2 and select the starting date (B2) and months (C2). Press Enter to return a result.
Note: The Starting and Ending Date should be in the same date format for Excel to execute the formula.
Use DATE Function To Add Or Subtract Years from a Date
The DATE function is a built-in date function in Excel that allows you to create a valid date based on individual year, month, and day components. The syntax of the DATE Function is:
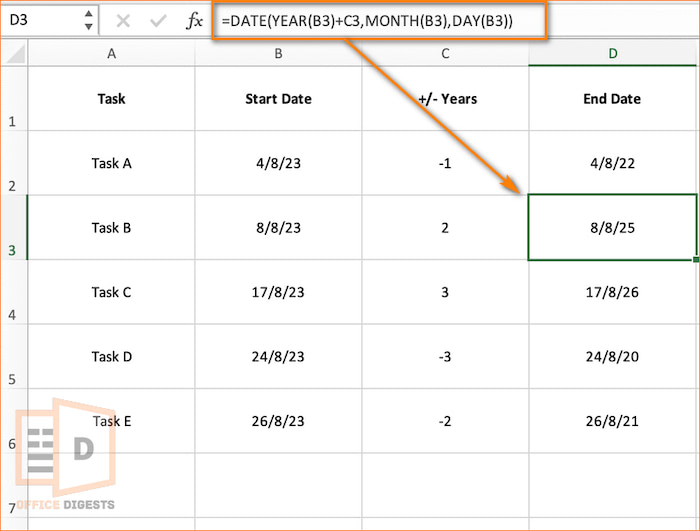
In our dataset, we replaced the months with years now. We will be using the DATE Function to add or subtract values from years/months/day. Depending on the component, the formula needs to be changed. Additionally, we will be using the YEAR, MONTH, and DAY Function individually.
Suppose, if we want to add months to a date, then the formula will be
Here, we are using the DATE function to add or subtract years from a date. So, our formula will be:
Conclusion
In this post, we covered how to add days, months, and years in Excel using both formula and a function. We also found out that the only way to deal with a mixture of date formats is a VBA Code.
Another bonus method is that- You can use the TODAY function to grasp today’s date and adjust the dates accordingly.


