In the quest for financial mastery, managing your personal budget becomes paramount. And as for collecting massive data, it becomes an agony.
Imagine you’re a sales manager responsible for tracking the performance of your sales team’s monthly targets. Amidst the numbers and calculations, a small yet mighty weapon awaits your command: border colors!
This visual distinction created by changing border colors not only adds a touch of creativity to your tracking process, but also provides a quick way to assess the team’s performance at a glance.
In this post, we will show you the 3 professional steps on how we visually clarify our team’s data by deftly formatting the border colors.
What is the default border color in Excel?
Microsoft Excel versions prior to Excel 2007 had a default border color of black. However, starting from Excel 2007 and onwards, the default border color changed to a lighter shade of gray.
Most importantly, the color may vary slightly depending on the specific theme or template you are using.
A border in Excel refers to a line that surrounds a cell or a group of cells. It is used to emphasize a particular section of a spreadsheet, making it more noticeable. By employing borders, you can emphasize particular elements, thereby enhancing the visual organization and comprehension of the spreadsheet.
Now, let’s move on to the three PRO! Methods of changing the border colors.
How To Change Cell Border Color in Excel
There are three ways to change the border colors. One is through the Ribbon and another is through the Formatting Dialog box. There’s also a keyboard shortcut method. That is pressing Alt, H, B, I one after the another.
Alt Button will select the Ribbon bar, H for the Home Tab, B for the Border options, and I for the Line color options.
Here are the methods to color cell border in Excel:
Method 1: Use the Ribbon Bar For Adding Line Colors
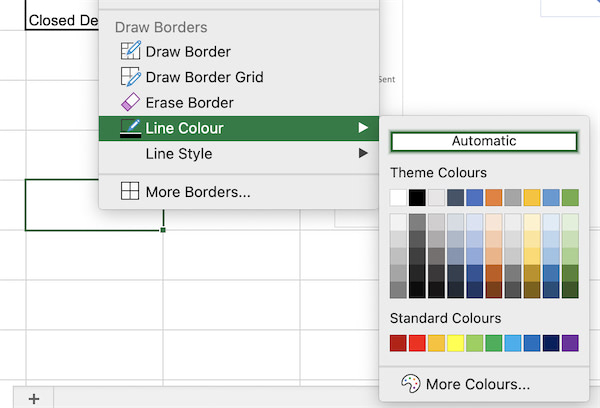
Go to the Home Tab and click on the drop-down menu of the Borders Icon. Under the Draw Border Section, click on the Line Color option. Select the Color you want to add. Drag the cells you want to add the color to.
PRO TIP: You can Draw a Border Diagonally across a cell by adding Line colors.
Drawback:
Selecting the cells first and then adding colors to the border won’t work. You have to first select the line colors and then drag the color to the desired cells.
The Ribbon Bar is easily accessible and that’s why it was the mouse-savvy method back then.
But now, most of the users find this method 1 efficient compared to method 2.
Method 2: Use the Format Dialog Box
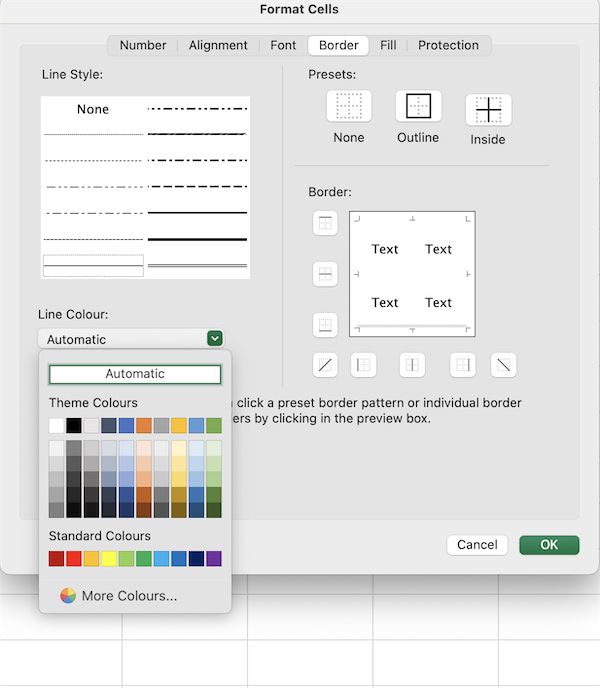
To change the line style, line color, and border pattern all at once, go to the Formatting dialog box by pressing Ctrl+1 (for Windows users) and Cmd+1 (for Mac Users). Then select the Border Option and change the Line style and color.
Click on a preset border pattern or select individual border patterns depending on your requirements.
Drawback:
You have to make separate selections for separate border styles.
Method 3: Add a Customized Table
If your dataset is ready for a Table format, then this method is the best one. You can add borders to those cells quickly without shading each row (like the Table designs).
To add border lines and change its color with the help of a table, go through the following steps.
- Select the data range and go to Insert > Table.
- Unselect the option that says “My Table has headers” and select OK.
- Select the Table Tab from the Ribbon bar and click on the Dropdown icon to select the New Table Style Option.
- Rename the Table style and go to Table Element.
- Click on the “Whole Table” option and Click on Format.
- Select the Line Style, Line color, and Border.
- Press OK to apply for changes.
Now you have a dedicated border for your dataset. This method works best for Tabular Data.
Drawback:
- Lengthy Process.
Solution: Perform the step once and save the Table Format as a preset for that workbook.
How To Remove All Cell Borders
Simply, select the whole sheet using Ctrl+A, or range of cells and go to the Home Tab. Click on the Border icon. Select the option that says, “No Border”. This will remove all the cell borders from the worksheet.
Note: Removing cell borders won’t remove the default gridlines. Sometimes printing the Excel sheet requires removing the grid lines from the workbook completely. You can either set the color to white, or tweak some minor settings.
Are Borders and Gridlines Same in Excel?
Many of us don’t know the difference between borders and gridlines in Excel. Both gridlines and borders are visual elements applied to cells and objects in a worksheet. But they serve a different purpose.
When you open an Excel workbook, the first thing you notice are faint lines throughout the whole sheet. These fainted lines are called grid lines. On the contrary, borders are customizable lines added to the edge of the cells, ranges, or objects.
Till now, we dealt with the method related to changing the border color. Let’s find out how to change the default gridline color.
How to Change The Gridline Color in Excel
You might ask:
Why Switch out grid line colors? This is because we can use grid lines as borders!
For Mac Users
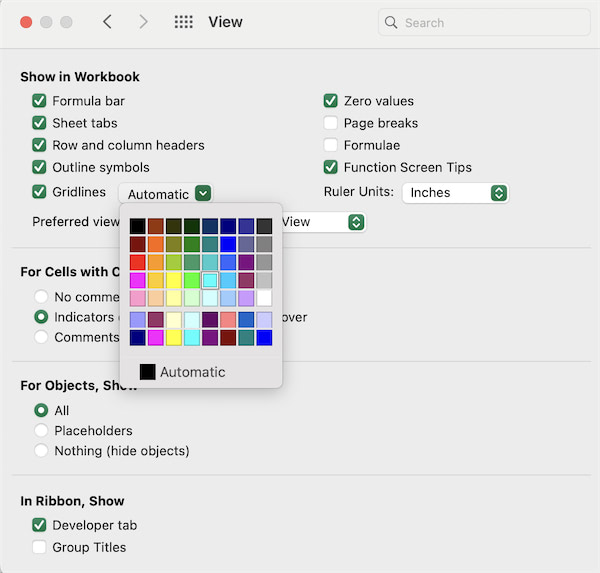
Open the Excel File and click on Excel from the top left side of your home screen. Select Preferences or use Cmd and comma (,) simultaneously.
Under the Authoring Tab, click on the View option. Ensure that the Gridline option is checked and set to a different color. By default, the color is set to automatic. Click OK to return to the spreadsheet.
This is how you change the whole Excel sheet gridline color.
For Windows Users
Open the Excel workbook and go to Files > Options > Advanced. Locate the Gridline option and change its color to your preferences. Press OK to apply for changes.
FAQ
Question: Where are borders and shading in Excel?
Answer: Borders and Shading refers to the Formatting options in Excel. It allows you to add shades or colors to a cell, range, and object. These options are available in the Home tab of the Excel ribbon under the Font and Alignment groups. The features are useful for creating reports, tables, and presentations.
Question: What is the shortcut for borders in Excel?
Answer: The shortcut keys to quickly apply borders to cells or ranges is Ctrl+Shift+7. This shortcut keys will add a thin solid line around the edges of the cell. And for Mac users, the shortcut key is Cmd+Option+7. If your device already has an in-built shortcut recommended for other purposes, the shortcut won’t work.
Question: What is the blue border in Excel?
Answer: Excel uses blue borders to denote the active cell. Active cell is the currently selected cell. When you click on a cell or select a range of cells, the blue border appears around the edges of the selected area.
Conclusion
In short, changing the border color in Excel is important because of:
- Enhanced Customization
- Visual Distinction
- Highlight specific areas
- Create Professional-looking reports
- Improve overall readability of the data.
Now that you have learnt how to change the visual representation of your data, you can apply it to your real life and make professional Excel templates for free.


