Suppose you are the branch manager of a reputed business organization. Your boss wants you to maintain detailed records of his employees. The next thing you do is create a spreadsheet for tracking employee attendance.
After several days of grinding, you want your work to become fully automated. That’s where Excel draws in.
You can automatically enter date and timestamp in Excel with the IF and NOW Function.
Stay Along, As I’m about to show you the detailed process on how to automatically enter date when data entered in a column in Excel.
How to Automatically Enter Date & Time After Data Entry in Excel
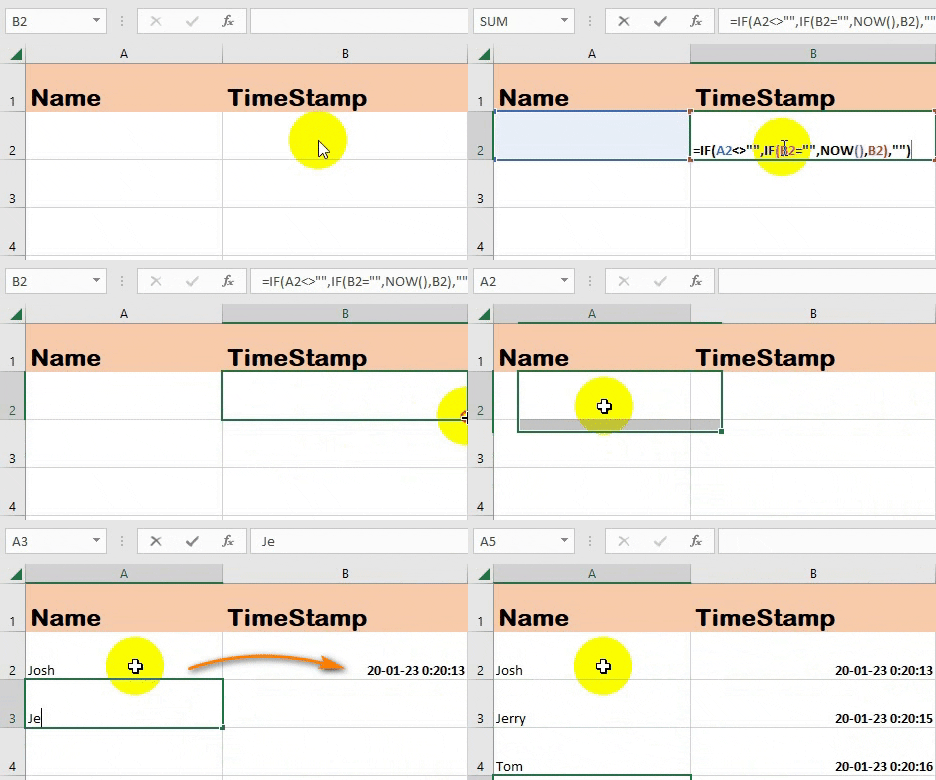
In the Beginning of this post, I prescribed a scenario to you where your boss wants you to track the attendance of every employee. Now, Let’s assume to create a spreadsheet where the employees will enter their name only and the timestamp will get automatically updated.
To do so, you have to use the combination of IF and NOW Function.
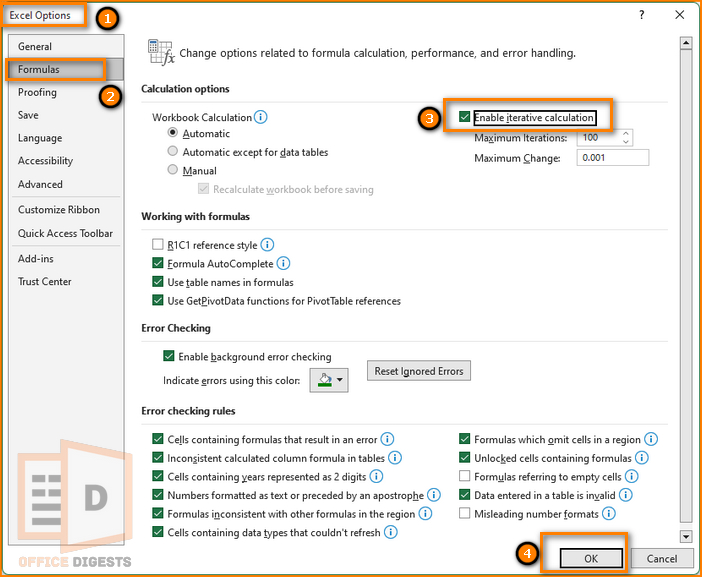
But first, you have to enable iterative calculation in Excel.
To enable iterative calculation in Excel for Windows, Go to Files > Options > Formulas > Enable Iterative Calculation.
For MacOS, Go to Excel > Preferences > Calculation > Check mark the option that says to use iterative calculation. This technique will bypass the non-ending loop of circular references in Excel. After that it is recommended to type the formula.
The Formula to automatically enter date and timestamp after each data entry is:
Explanation of the Formula
You are commanding Excel that if A2 cell is not equal to blank (<> represents not equal in Excel) then run another command. If A2 is not blank then check if B2 is blank or not. If blank then run the NOW() function. If not blank then show the value of B2 in that cell. The extension of the formula indicates that If A2 is not blank then run the latter command or leave it as an empty cell.
After typing the formula and choosing the required number format, use the fill handle and drag the cursor to the last cell you need for data entry.
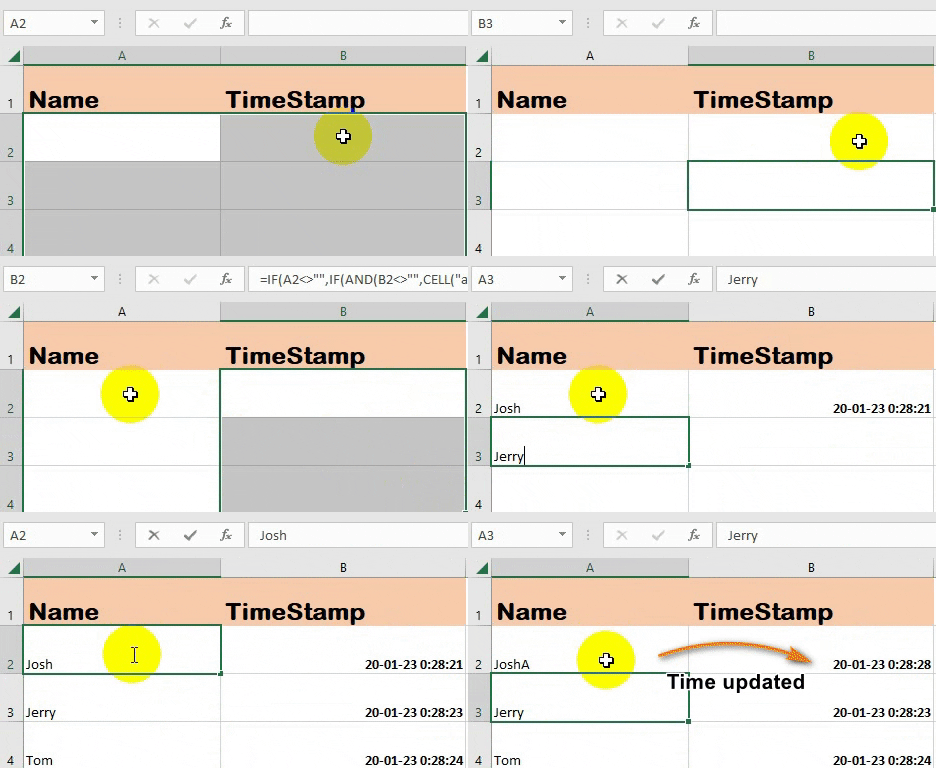
Change Timestamp Every Time You Update Data
From the above section you found out that combining IF and NOW Functions show the exact timestamp. But, there is one drawback. Try updating your data. The timestamp didn’t change, right?
So, if you want a completely dynamic timestamp every time you update data, you must use the CELL, ADDRESS, and NOW Functions.
The formula to dynamically change timestamp and date every time you update data is as follows–
Detailed Explanation Of The Formula
You are commanding Excel to use the IF function and its variants to check for certain conditions in cells A2 and B2, and return a value based on those conditions.
The outermost IF function checks if cell A2 is not empty (<>””). If it is not empty, then execute the next IF function.
The second IF function uses the AND function to check if both cell B2 is not empty (<>””) and the address of the current cell is the same as the address of cell A2 (using the CELL and ADDRESS functions). If both of these conditions are true, then the function returns the current date and time using the NOW() function.
If the second condition is not true, then the third IF function is executed. This function checks if the address of the current cell is not the same as the address of cell A2. If it is not the same, the function returns the value in cell B2. Else it returns the current date and time.
If the outermost condition is not met, the function returns an empty string (“”).
How To Automatically Enter Dates in Excel
Adding dates manually is easy if you have a short data set. But what if you need to create a tracking attendance of 100 employees? You can use multiple techniques to make your task fully automatic.
Some of the useful shortcuts are discussed below:
Use the Keyboard Shortcut
I know it’s tough to memorize every single Excel shortcut. But after a few days of practice you will get the hang of it.
Suppose you want to display the present date and time automatically each time formulas are recalculated. Follow the table below to know how to use the keyboard shortcut for date and time in Excel across multiple devices.
| Operating System | Keyboard Shortcut | Description | Result |
| Windows | Ctrl+; (semi-colon) | Insert Current Date | 19/1/2023 |
| Ctrl+Shift+; (semi-colon) | Insert Current Time | 2:59 PM | |
| Ctrl+;(semi-colon), Space, Ctrl+Shift+; (semi-colon) | Insert the Current Date and Time | 19/1/2023 2:59 PM | |
| MacOS | Control+; (semi-colon) | Insert Current Date | 19/1/2023 |
| Command+; (semi-colon) | Insert Current Time | 2:59 PM | |
| Ctrl+;(semi-colon), Space, Cmd+;(semi-colon) | Insert the Current Date and Time | 19/1/2023 2:59 PM |

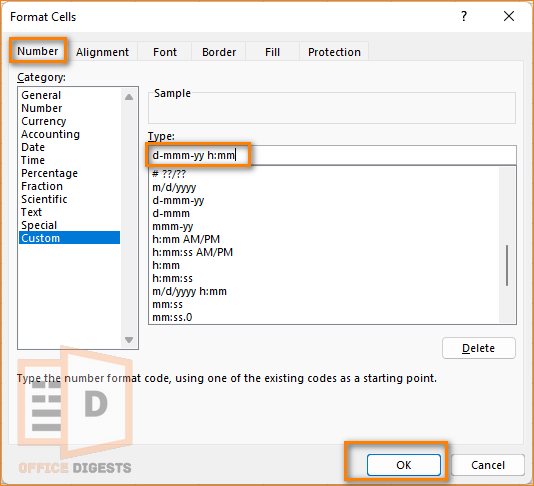
To change the date or time format, right-click on the cell and Go to Format Cells. Choose the Tab you want to modify. Or create a custom format under the category section of the Number’s tab. Select the format you like and click OK.
I personally prefer the d-m-yy h:mm format where, d, m, yy, h, and mm stands for day, month, year, hour, and minute respectively.
Change the Date and Time Dynamically
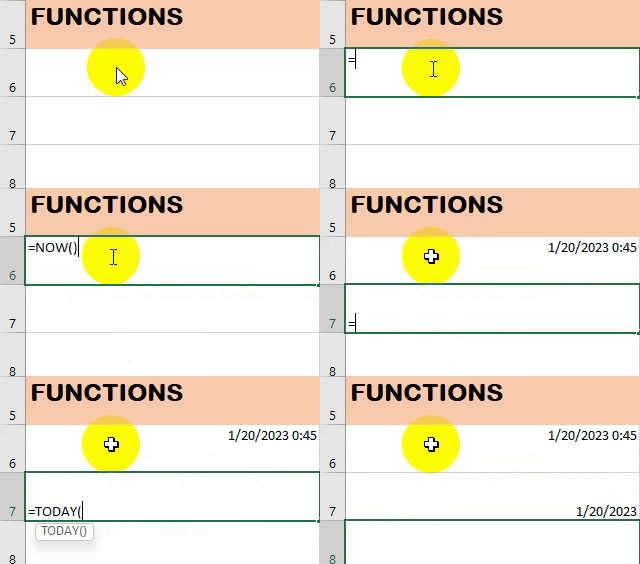
The Keyboard shortcut method taught earlier was static. And not much handy if you want automated data. You can use the NOW() and TODAY() Function that works dynamically every time you enter data in a cell. The date and time will get updated based upon your computer’s system clock.
Select a blank cell where you want to display the date only. Type =TODAY() function to show the year, month, and date. Type =NOW() if you want to display the date and time altogether. To change the format, Go to the Home Tab on the top left corner of the Ribbon and select the number format.
Embed A VBA Code
This section is for pro excel users. For Enabling the Visual Basic Editor, you need to turn on the Developer Tab.
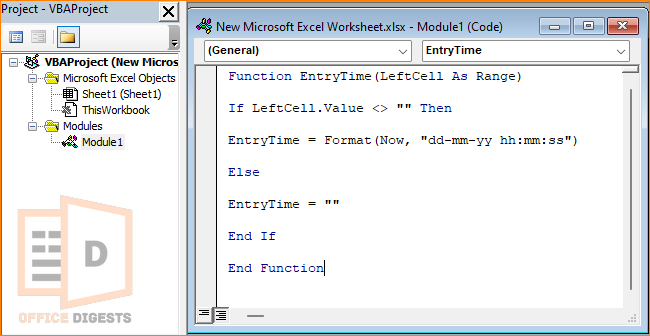
Once you enabled the Visual Basic Analysis Tab, you have to copy and paste the following module–
Function EntryTime(LeftCell As Range)
If LeftCell.Value <> "" Then
EntryTime = Format(Now, "dd-mm-yy hh:mm:ss")
Else
EntryTime = ""
End If
End Function
Save and Run the module. This will activate the date and time function automatically after you enter any data in the cell.
Explanation of the VBA Module
You are enabling VBA and inserting a module that deals with a function called EntryTime. The EntryTime Function takes only the single assigned argument present in the LeftCell in the spreadsheet. The function checks whether the value of the LeftCell is empty or not. If the value is not blank (<>””), the function assigns the current date and time to the variable EntryTime in the format of dd-mm-yy hh:mm:ss. If the value is empty, the function returns an empty cell.
Alternative Functions To Enter Month & Date
There are several alternating methods of entering year, month, and date in the excel spreadsheet. But, none of them are fully automated. You have to manually input data according to your need.
Some of the Functions Include EOMONTH(), DATE(), EDATE(), DATEDIF(), WORKDAY(). And if you want to skip one or two days, you can use the Fill Series Command. Type the date in any of the cells using the NOW() Function. Then Click on the Fill handle. Click on the Fill Series. Type the Step Value according to need. Check mark the Date Unit and Type. Click OK and you are good to go.
Final Words
Automatically Entering Date and Time using Functions like NOW(), TODAY(), DATE(), etc. can be easy for tracking data. These functions can save a lot of time and effort when working with large amounts of data.
The methods described above are proven and don’t require any professional hands. Hope you could gather detailed knowledge regarding the topic. For Better and more Excel tutorials do keep an eye on our site.


